August 31, 2012

The 20$ Makeup Challenge

If you've been reading this blog you may have noticed that I tend to feature higher-end brands. That's not because I disdain drugstore makeup, or don't use it. I think there a lot of really fantastic cosmetics available at the drugstore (or via inexpensive online brands), many of which I consider my personal staples or that I use on other people when I do their makeup.

I do tend to focus on the higher-end brands because those are often the items that people want the most information about, and do the most research on. I mean, a foundation fail at 6$ is far easier to swallow than one at 45$. And expensive makeup tends to be prettier makeup, as far as presentation is concerned, which does make it more fun to blog about.

That said, I love my drugstore gems, and I couldn't resist this challenge when I saw it popping up on youtube. It's especially interesting to do in Canada, simply because we have both higher prices (foundation averages 10$ - half the budget!) and fewer options (no ELF, for example, except in some dollar stores).

If you're not familiar with the tag, the idea is to imagine that you're traveling and have somehow lost your luggage, including your makeup, and you have 20$ (not including tax) to spend at your average drugstore to create a full face. Some youtubers have also tailored the tag to "what to get if you only have 20$ to start your makeup collection". (To my mind, the latter idea is not something the original concept overlaps with particularly well. What you get in an emergency to do a full face is not what I would spend my money on if I wanted to start building a collection. I'm debating a video series devoted to that idea however - like if you could only spend a set amount every month, how would you go about getting the best budget basics over a year.)


I did have fun with this challenge, but I'm not sure how well I succeeded in creating a legitimate look. The foundation was definitely the most difficult thing to get right, as I was limited to three options if I wanted to stay on-budget and using regularly-priced items. A setting powder would have been nice, but there was just no way to work another 5-6$ into the budget.

Omitting brushes was the easiest part. Good brushes will make application easier and more polished, certainly, but at the end of the day, your hands are the most versatile tool.


What I ended up using, coming in at 19.86$:

Rimmel Clean Finish Foundation in Soft Beige 5.97$
Wet'n'Wild 8-pan Palette in Comfort Zone 4.64$
Rimmel Extra Super Lash Mascara in Black 4.48$
NYC Ultra Last Lipwear in Mousse 1.77$
Nobel 1/4 Angled Synthetic Brush 3$


I wasn't super impressed with the foundation. The coverage is a little too light (though if I had a concealer it would be ok), and the texture is difficult to work with. Because of the high silicone content, it's a little thick and dries really fast, making blending tricky. Rimmel claims it creates a poreless finish, but I found the opposite to be true once the skin's natural oils started coming through. It's not a bad foundation, and for the price alone worth considering, but I don't think it will play nicely on a lot of skin types.

The mascara was just ok. It was a staple for my years ago, but now I find it lacklustre. Not enough volume for me. It is, however, resistant to smudging, so if you prefer a natural look it's worth looking at.

The clear winners for me were the WnW palette and the NYC lipstick. The palette is just so versatile and a terrific value for the price. The shadows are soft and pigmented. I do wish there was a matte shade or two in there, and that the texture was a little less thin - it can be prone to wiping away easily as you're trying to blend - but those are minor complaints compared to all the pluses.

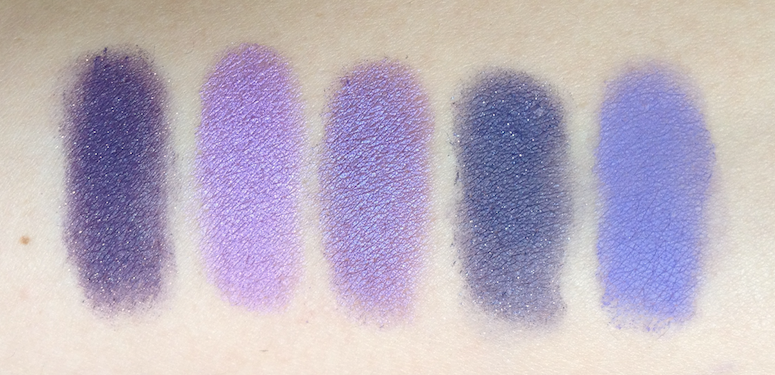
Wet'n'Wild Comfort Zone.
Left to right: Browbone shade from the neutral side, browbone shade from the greenish side,
eyelid shade, crease shade, definer shade (MAC Club dupe)


The lipstick is a great formula as well. Unlike a lot of cheaper lipsticks, it doesn't feel greasy on the lips, and has no smell or taste. The range of colors is good, and it really does wear for  4-6 hours, while feeling comfortable.

NYC Mousse. 

The palette and the lipstick I would buy again, and recommend as good budget investments for the makeup beginner.

I know there was a fad a while back of using artist brushes to replace MAC ones. The Loew-Cornell mop brush, I believe, was touted as a dupe for the MAC 239. I bought one, but didn't find it lived up to the original. I did come across a treasure trove of synthetic liner brushes of various shapes and sizes, and absolutely love those. If you use cream liner, getting a bunch of those for a couple of bucks a pop and rotating them is far more user-friendly than cleaning the same crusty brush over and over.

So yes, a really interesting challenge for me, and hopefully it's entertaining and useful to others!

(I purchased all the items at Wal-Mart.)

August 22, 2012

Hourglass Illume Creme-to-Powder Bronzer Duo - in Sunset

I was introduced to the Hourglass brand back when I worked for Sephora and, let me tell you, they have one of the best national trainers of any brand I've ever come across. After he was done, I was ready to buy every single product, and then backups, and then doubles for my mom. He was just so charming and informed, it was impossible not to love him or the brand.

It's been years since that experience, and Hourglass is still one of my favorite brands - on its own merits. Their aesthetic design, product quality and inventiveness should serve as an example to other high-end brands. I also appreciate that they have focused on growing their brand slowly and organically, rather than jumping onto the limited-edition bandwagon. It seems like every new addition to the line is well-considered.

Knowing that, I didn't hesitate too much when I saw the Creme-to-Powder Bronzer Duo at the Sephora in Montreal. I have been waffling forever on the Chanel Soleil Tan Bronzing Makeup Base, but this looked like it might prove to be more useful in the long run.


The packaging is elegant and luxe without feeling ostentatious or old-fashioned. Plus, I am a fan of the swivel-top mirror construction. Not only is the mirror a nice, substantial size, but since it can turn all the way around (and lie flat either way) and stay in whatever angle you chose, it is terrific for travelling, especially if you want to apply your makeup while using both hands. 


Ok, I have to say the orange tone of the bronzer portion freaked me out a bit. Under the store lighting, it looked more brown than it does under natural lighting, and my initial reaction when I took it out at home was...bemused, to say the least. (You can view it live in this youtube post, 3 minutes 30 seconds in.)

But I needn't have worried.

Swatched with a lip brush, indirect natural light.

Artificial light.

Direct sunlight.
Blended out, indirect natural light.

Blended, mix of artificial and natural light.

 The pigment on these is beautiful - intense, but utterly pliable. It can be layered up as much as you want to, or sheered out for the barest hint of color.

The blush is a very flattering warm rose that looks what you'd like your natural flushed cheek to look like (as opposed to the hectic shade most of get, that looks like you're about to have heatstroke on the spot). The bronze thankfully came out as more of a warm-toned light brown than anything resembling a citrus fruit. It can work as both a bronzer when applied with a fluffier brush, and as a contour when applied with a narrower brush, like the Real Techniques Contour Brush.

The texture is ultra-light. Though it is a cream, it has an incredible kind of slip to it. It doesn't feel greasy or silicone-y, and smooths onto the skin without gripping or dragging, making it very easy to blend in. I had no issues applying it to bare skin, on top of foundation, or on top of powder.

The lightness also means that is second-skin, virtually invisible on the skin in terms of texture. It goes from cream to powder, but without a powdery finish, and it give you a good 4-5 minutes to blend and play before setting. Once it sets, it wears throughout the day, even on bare skin. The finish looks a bit luminous here because of the lighting, but it actually dries down relatively matte. There is no shine or shimmer. It works on oilier skin and doesn't pick up on dry patches.

This is one of my favorite new items, and while it's perfect for Summer, I think the shades are classic enough to be appropriate for any season. It's ideal to toss into your purse for work or into your weekender for a no-fuss look. It it pricy, but you're also getting two products in one. (For comparison, the duo is 11 grams, and a Stila Convertible Color is 4.5 grams.)

Availability: Sephora stores and online. The price 46$ CAD.

Pros: Flattering, neutral-ish shades that should work with a variety of skin tones, up to deeper medium, and across most complexion types. Imperceptible texture, natural finish. Fully buildable from sheer to HELLO THERE.

Cons: Nothing I can think of, except maybe that the packaging is not airtight and may be problematic over time, but I haven't experienced any drying out or change in texture so far.

(I purchased this item at Sephora.)

August 15, 2012

Inglot Eyeshadows - Cool Neutrals and Greys

Another post in my Inglot eyeshadow swatch series. These eyeshadows can be purchased from Beautylish.

As a refresher, this is my personal breakdown of the finishes:

AMC - textures range, but overall are supposed to be some of the most pigmented shades they offer.

Shine - finely milled, buildable, with lovely sheen.

Pearl - have anywhere from a light pearl, to a frosty, even metallic finish.

Matte - completely matte, and incredibly pigmented and buttery for this type of finish. Easily one of the best matte textures on the market.

Double Sparkle - tend to have a matte or satin base, with some very fine sparkle layered in.

The following palette was my attempt at a "cool" neutral set. Mostly focused on greys and plumy taupes.

Inglot Eyeshadows - Cool Neutrals and Greys

Inglot Eyeshadows - Cool Neutrals and Greys


All of the following swatches are on bare skin, as usual.

Inglot Eyeshadows - Cool Neutrals and Greys
Indirect natural light.

Inglot Eyeshadows - Cool Neutrals and Greys
Combo of indirect natural light and artificial light.

Inglot Eyeshadows - Cool Neutrals and Greys
Direct sunlight.

The top row: pearl 434, pearl 420, pearl 444, pearl 448, shine 35.

Yeah. ALL of these are super-duper pigmented, dense and buttery, with the shine 35 being the sheerest as can be see in the full sunlight swatch. Pearl 434 and pearl 420 are my picks - both are incredibly beautiful plum-tone greys.

Inglot Eyeshadows - Cool Neutrals and Greys
Indirect natural light.

Inglot Eyeshadows - Cool Neutrals and Greys
Combo of natural and artificial light.
Inglot Eyeshadows - Cool Neutrals and Greys
Direct sunlight.

Bottom row: matte 378, double sparkle 460, pearl 423, matte 344, pearl 397.

Both of the mattes here are fantastic. So dense you have to be careful how much you pick up. With a soft brush and a delicate hand, the matte 378 is amazing for the crease and outer V. The matte 344 is my choice for blending out a darker shade from the crease. The double sparkle 460 has a smoother, less dry texture than most of the other DS shades I own, and the micro-glitter is less apt to fall down during application. I was a little surprised by how pale the pearl 397 actually was when applied to the skin compared to its peachy appearance in the pan, but it makes for an excellent color to use on the inner corner of the eye.

For cool-toned skin, I think these shades are stellar, and they can't be faulted for performance.

I have one more palette to swatch, but in the meantime - what do you guys think of the Inglot shadows so far?

(I purchased these from Inglot.)

August 13, 2012

Inglot Eyeshadows - Purple and Burgundy

I meant to get back to these swatches sooner, but...well, shiny new things distracted me. These eyeshadows can be purchased from Beautylish.

My general thoughts on the eyeshadow formula are included in the first post in the series here. The rest of the posts are viewable here.

All swatches are on bare skin, no primer.

Inglot Eyeshadows - Purple and Burgundy

Inglot Eyeshadows - Purple and Burgundy


Man, I love purples. I only wish I had green eyes to really make these colours pop.

Inglot Eyeshadows - Purple and Burgundy
Indirect natural light.

Inglot Eyeshadows - Purple and Burgundy
Indirect natural light, different angle.

Inglot Eyeshadows - Purple and Burgundy
Direct sunlight.

The top row: matte 325, pearl 446, pearl 452, pearl 445, pearl 440

The application and pigmentation on all of these is excellent. Classic Inglot - buttery, dense, excellent payoff. The matte shade is almost ridiculously pigmented, and by far one of the best purples I have ever encountered.

Inglot Eyeshadows - Purple and Burgundy

Inglot Eyeshadows - Purple and Burgundy

Inglot Eyeshadows - Purple and Burgundy


Bottom row: double sparkle 494, pearl 441, pearl 439, amc 67, matte 379

The DS and AMC shades both gave me the most trouble, in that they had a somewhat drier texture that grabbed onto the skin, making blending less smooth. That said, they are both still intensely pigmented, they just need more care in application. The microglitter does tend to fall out during application as well.

Pearl 441 has a beautiful, subtle duochrome effect - a gorgeous light violet that flashes a teeny bit blue.

Purples tend to be one of the most difficult colours to get right, so kudos to Inglot for making enough that I can easily put together a full palette of great performers.

August 03, 2012

Ellis Faas Light Eyeshadow - E305 Holographic Bordeaux

In my recent Sephora haul video, I mentioned how excited I was that Ellis Faas was being featured at the new Montreal location. This is a brand that I've been lemming since I first saw it mentioned on youtube, either by Samantha Chapman or Lisa Eldridge, so when I saw the shiny new counter and the gleaming bullet-shaped tester tubes, I was positively giddy. I limited myself to just one item from the line - the Light Eyeshadow in E305, a beautiful teal/burgundy duochrome.

I was SO sure I would be back for more.

My first hint of trouble was the way in which the bottom portion of the twist-tube fell off as soon as I took it out of the box. Granted, this was not a functional piece, so I shrugged, figured I would crazy glue it back on, and popped open the cap. Only to see that the brush was wildy splayed, as if someone had already taken it out and mooshed it back in, willy-nilly. Except that I saw the Sephora SA take the box out fresh from the drawer, still rubber-banded together with its compatriots. This did not bode well, but I figured hey, I'll soak it in water and pinch it back into proper form. No worries.

As you can see from these pictures, everything looked just fine after I took care of these superficial quirks.

The little cap on the end, to the left of the ribbed portion is what fell off.


And then I tried to get some product out. I rotated the twist-bottom, about 15 clicks through. Waited patiently. Nothing. Rotated another 15. Nothing. ANOTHER 15. Zilch. Tried 20, another 20, and finally a few clicks after that I saw some promising shadowing coming through the brush base and then, finally, actual color appeared.

EIGHTY FREAKIN' CLICKS LATER.

But the product that came out was so pretty! So promising! I was still clutching to my hopes and dreams.

The red-brown base shade visible here.

And the teal duochrome showing up under a different angle of the light.

Indirect natural light, angled away from light source.

Indirect natural light.


I mean, how gorgeous is that colour??

And then I tried wearing it.

First of all, why make something that is ostensibly packaged for ease of application, and then make the built-in brush extraordinarily ill-suited to the task of applying and/or blending? It's just so oddly shaped and finished, leading to a choppy laydown (which is just what you want with a cream/liquid product) and impossible blending (it basically picks up what you laid down if you sweep it over the same place). You need to pat it on, and then spread and blend with your fingers or another brush.

This is assuming you work lightening fast. This sucker sets almost instantly, making any kind of blending very difficult. But hey, no worries, because it comes off easily with water. Yes, WATER. Not soap and water, not a micellar water. Just water. You can literally wet your finger and rub it away. Which is great if you have a weird edge you want to soften, but not so great for any situation where you might encounter moisture - like, say, rainy days, crying, or you know, your skin doing its thing.

As a test, I applied this all over my eyelid in a fairly thin layer, all the way up and into my crease (where I tried blending, to little effect). Over bare skin, this lasted maybe an hour before it started creasing and fading. After the end of my workday, all that was left was a faint line of product close to my lashline. The remainder had migrated to my crease lines, flaked off or otherwise disappeared into the ether.

To be fair, I also tested it over a primer (Too Faced). Two hours later, it started flaking off and going patchy, though it held off on obvious creasing for about 4 hours. The picture below is at the two-hour mark. I had applied it in a thin layer all over my eyelid, from inner corner to outer and up through the crease in an almond shape. No blending. There's flaking up in the crease and below my eye (more not visible under my lashes), as well as fading at the inner and outer corners and a bit over the center of my lid.

Apologies for the crappy bathroom lighting.
And lack of other makeup.

In desperation, I tried applying an even thinner layer. Like, a tiny pat that I spread delicately over my eyelid until it was barely tinted. This actually gave an interesting, ethereal sort of luminosity. It still faded and flaked, though the latter was not as noticeable.

But you guys. This is probably one of the most ill-performing products I have tried in a really long time, and certainly the most expensive one to bear that distinction.  Those people who love it and get their money's worth out of it - I envy you, and suspect sorcery of some sort. :P

For me, it's just not worth the time and effort it takes to make 50$ worth of product sort of workable under very limited circumstances. It's entirely possible the other products in the range might work better for me, but at this point I have no intention of finding out.

Availability: Sephora, and the Ellis Faas website. Price is 50$ CAD.

Cons: Erm. *points to review up above*

Pros: It's a REALLY pretty color.

(I purchased this item from Sephora.)

EDIT: I was recently contacted by a rep from Ellis Faas, who was curious to know more about my experience with this item. Apparently the packaging/clicker issues are not news to them, but the flaking and creasing I experienced was. After going through the possibilities (eye cream, primer), they are still baffled as to why it performed so poorly for me, when the feedback regarding performance has generally been positive. I possibly have freakish eyelids, crazy skin chemistry or I had a defective model. Either way, take that for what it's worth.

August 01, 2012

Estée Lauder Pure Color Blush - Pink Kiss

So, Tom Pecheux is genius. I'm not even kidding. He has reinvented the EL brand without bastardizing it, staying true to its classic structure. If you haven't passed by the Estée counter recently, do yourself a favor and take a look at the new Violet Underground Fall collection. If that is not one of the most awesome collections out this season, then I am a monkey's uncle. I will have some reviews up for that collection as soon as I can purchase it, but in the meantime, let's chat about something from the new and improved permanent range - the Pure Color Blush.

These blushes are substantial in size and come packaged in the redesigned compact. There's something terrifically modern and luxe about the generous, squared off shape. While they are not as dense and buttery as the Tom Ford blushes, they have a similar appeal and a friendlier impact on your wallet.


Pink Kiss is one of the more natural shades in the range, a soft, neutral toned pink that should suit a lot of skin tones in the light-to-medium range. I feel like it's one of those pink that can pull a bit cool or warm depending on your coloring and the light.

It has what Estée Lauder considers a 'satin' finish. The underlying color is satin, but it does have very fine micro-glitter layered in there as well, which can be seen in the swatches below. Not as obnoxious as some of the Nars blushes, and it mostly buffs out when blended, but be aware that it is there and can be a little more obvious under bright lights. The overall effect is slightly sheeny, and flattering.

The texture is interesting - not particularly buttery, but fairly dense, it applies beautifully. It blends right in without building up any texture on the skin. The pigmentation is ideal for me - enough to show up easily but not so strong that you have to be super careful in your application.

Indirect natural light.

Direct sunlight.

Blended out over larger surface, indirect light.

Availability: Nordstrom, Neiman Marcus, Bergdorf Goodman, as well as The Bay and the Estée Lauder website. Price is 32$ CAD (28$ USD).

Pros: Easily wearable pigmentation level. Lovely sheen, blends beautifully. Great everyday color for light to medium skin tones.

Cons: Micro-glitter may remain visible in some lights, making the perfect office shade problematic for some.

(I purchased this item at the EL counter at The Bay.)