And so it goes.
One thing I've realized doing this de-clutter: I have a wildly inaccurate perception of my reviewing capacity. I've pulled out so many items that I purchased (often in multiple shades) with the sole intention of reviewing - and they're still sealed, mocking my intentions with their plastic-coated goodness.
This is the pile of assorted lip products (glosses, stains, lipsticks) that are exiting my collection. I posted it on Instagram and got some lovely comments from people, very encouraging and congratulatory. Which I really appreciated, since I was depressed about how much time and money I've wasted.
But...that pile is still barely a dent. I have a serious lip goo problem. Here's what's left...
First up - the lip balm and stain drawer. Grouped roughly by cruelty-free (the three trays to the right) and not (pretty much everything else), so when it comes time for Round Two of the decluttering process I can focus on the non-CF side more easily. (That's assuming I don't wind up drinking wine under my desk by the end of this, Sherbatsky-style.)
Side note: those Fresh balms are my favourite, and have been for years, but Fresh is not currently CF. I welcome suggestions for an alternative, since balm is one of those staples that I will have to replace eventually.
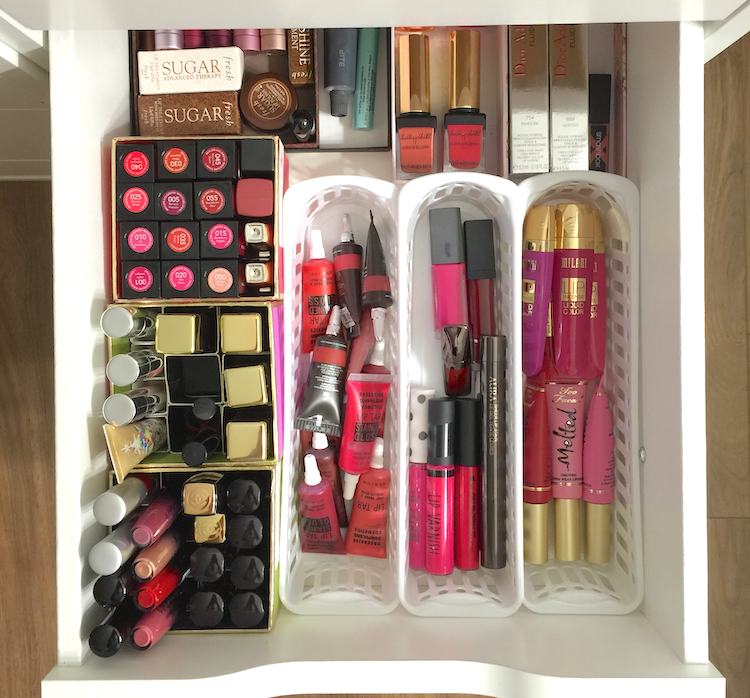
Next up is the lip crayon drawer. I pulled out all the Revlon ones that had yet to be used....and kinda threw in the towel after that. These things are so damn easy to use and carry around. I need moral fortitude to give more of them up. (Again grouped by CF/not CF, with the Revlon/Rimmel and Clinique/MAC being the only non CF ones.)
Oh god, the lipgloss. This is some serious goo, here. At least this was easy to parse out. Anything that was still sealed went into the potential sale/giveaway pile. A few things that were open but still new - and that didn't evoke a need to clutch it to my chest protectively - went into the "give it to my mom" pile.
Then there where all the ones that earned a sketchy look during the smell test. Those went into the "toss it" red bag in the picture up top.
And so I'm left with the CF drawer...
And the non CF drawer.
LISTEN, I KNOW. But it only gets worse. Following the same strategy as above...
....the CF lipsticks.
And the non-CF lipsticks.
(And yes, I know the Clinique ones are still boxed. I just bought them before I started this whole thing, and I can't make myself let go of them just yet. Because....reasons.)
WHY DO I HAVE SO MANY OF YOU?? WHY MUST YOU BE SO ADORABLE IN YOUR LITTLE BULLETS AND PRETTY COLOURS?
Also, is it time for wine?
June 10, 2015
April 27, 2015
Make Up For Ever Step 1 Skin Equalizer - Redness Correcting Primer, Radiant Primer Yellow, Smoothing Primer
Press samples.
GWP at Sephora.
Contains affiliate link.
I also tried the old Make Up For Ever primers, and while they definitely had a more palatable texture - lotion-like rather than slippy - I can't remember being particularly blown away. I generally love MUFE as a brand, though, so I was hopeful about the recently relaunched version and jumped on the chance to test run a couple.
The major advantage and selling point for the Step 1 Skin Equalizer (43$ CAD) series is that the range addresses a variety of needs. Rather than billing one primer as a one-size-fits-all solution, MUFE has ten different options on the table - there's something here, theoretically, for every skin type, texture and tone. Better yet, they can be combined for optimal performance. (They suggest combining the redness correcting or radiance boosting primers before the mattifying or smoothing ones, and the hydrating and smoothing before the correcting or radiance ones. My skin is a crazy topographical map right now, so I apply what I need in specific areas rather than layering them, but it's all up to you, which is the beauty of this concept.)
I've only tested three - the Redness Correcting Primer, Radiant Primer Yellow, and Smoothing Primer - so I can't speak to how the texture of each primer varies, but these feel rather similar to each other.
The Radiant Primer Yellow and Redness Correcting have an identical texture: lightweight and a bit creamy, but with that disappears-into-the-skin finish that is the hallmark of a sophisticated silicone formulation. The Smoothing Primer feels a bit thicker, and reminds me of the Benefit Professional - which makes sense, since it needs to have a bit more weight to smooth down those pores and rough edges. It does a similar disappearing act, however, and bypasses that gross, overly slippy feel of the Smashbox type primers.
I would say the colour correcting is fairly subtle. (It's primer, not concealer.) The Redness Correcting does indeed tone down the redness, as does the Radiant Primer Yellow, to some degree. I do prefer the latter, however, as it also boosts the warmth in my skin, whereas the green tinge of the former emphasizes the olive tones. With foundation overtop, it's not a huge deal, and if you really prefer to negate the redness and aren't prone to looking sallow, the Redness Correcting Primer will probably be your pick.
The Smoothing Primer does reduce the appearance of my pores, and helps to minimize the texture of skin around blemishes. It's not quite photoshop, but it definitely helps to create a more even base for my foundation. It also mattifies slightly, though it doesn't control oil much better than any other primer I've tried.
What I especially like about all these primers is how smooth and soft my skin feels after applying them - not tight or flaky, like some primers can leave it feeling. All of them are excellent for getting foundation to apply super evenly, and it nudges up the time-frame for flake-free, shine-free wear.
![]() |
Smoothing Primer, Radiant Primer Yellow, Redness Correcting Primer |
On the left, my bare skin, with some moisturizer that was applied about 45 minutes before the picture. I've been having some kind of skin reaction to skincare samples I was testing (waaaaayyyyy too many at once, hence The Red Spot of Rage).
In the middle, I have the Smoothing Primer applied to my nose, forehead and my inner cheek area. You can see the mattifying effect, and the way the pores are less obvious. The slight texture in my undereye area is also softened. I used the Radiant Primer Yellow on my cheeks, jaw and chin, and some of the redness is attenuated.
On the right, I've applied one layer of foundation (MUFE Mat Velvet, with a tiny drop of Ellis Faas to cut through the matte finish somewhat), with a bit more dabbed over the TRSoR. As you can see, the application is really smooth and even.
And the full makeup...
Are any of you trying these new primers out? What do you think? I'm quite tempted to give the Mattifying and Hydrating ones a go, down the line. In case you're thinking about making a Sephora order soon, you can choose between four deluxe sized samples with the code MUFESKIN (with a 35$ CAD minimum purchase, I believe).
(Items provided by the brand, aside from the GWP sample from a Sephora order. This post is not sponsored or compensated.)
April 26, 2015
Urban Decay Sheer Revolution Lipstick - Sheer Ladyflower and Sheer Obsessed
Press samples.
Affiliate link.
Affiliate link.
The Sheer Revolution Lipstick (26$ CAD) range from Urban Decay has been out for a little while, but I just recently got to try a few shades: Sheer Ladyflower and Sheer Obsessed. I've been pretty obsessed with either straight up balms or more opaque cream finish lipsticks, so these weren't high up on my radar. I'd heard good things, and I was probably going to snag a few, but I wasn't storming the gates for them.
The more fool I.
The packaging is similar to the regular Revolution Lipstick, with a fluid and relatively weighty metallic bullet casing, this time in a violet chrome as opposed to pewter.
Unlike the bulky packaging that UD tends towards when it comes to their palettes, this is all sleek and chic, but still totally modern and cool. I feel cool carrying this in my purse. :P
![]() |
Sheer Obsessed and Sheer Ladyflower |
![]() |
Sheer Ladyflower and Sheer Obsessed |
I wouldn't say they're particularly hydrating, but again, comfortable feeling. They're quite shiny, almost juicy initially, but that settles. Wear time is minimal, however. I don't think I've gone longer than an hour and half without needing a touch up, so be warned that you may be going through that tube pretty fast.
These didn't settle into lines or emphasize dry patches, and had the nice effect of smoothing out the lip slightly, either due to the shine or the more balmy texture.
![]() |
Top to bottom: Sheer Obsessed and Sheer Ladyflower |
Sheer Obsessed is described as a candy pink, and it's definitely a light, cool toned pink with a milky/pastel tone. I don't think I would have ever thought to pick up a shade like this, as I would have assumed it would look too light or chalky. I think the translucency keeps it from looking stark. It almost has a bit of a lilac tone to it against my skintone, and it's just an awesome shade for spring.
![]() |
Sheer Obsessed |
![]() |
Sheer Ladyflower |
Have you tried anything from the Revolution range, either the original or the Sheer version? Are there any other sheer type lipsticks that you're currently crushing on?
(Items provided by the brand. This post is not sponsored or otherwise compensated.)
Subscribe to:
Posts (Atom)