Showing posts with label inglot. Show all posts

May 08, 2013

The Makeup Show NYC 2013 - Recap and Pictures

Aaaaaand we're back.

The Makeup Show was INSANE. And really, really fun. I'm so glad I was able to make it down this year. The seminars were wonderful - Dick Page was the single most inspiring speaker, so much so that I completely forgot to take any pictures or video!!!

The vendor list was incredible as well, with a good balance of big name or high-end brands (Nars, MAC, Ellis Faas), pro artist brands (Graftobian, Cinema Secrets, Mehron, Temptu) and start-ups or those new to the North American market (Layla, MAKE Color). The line-ups were particularly long for OCC, MUFE (which went around the room!) and Inglot, but well worth it for the discounts if you weren't already signed up.

The crowd was interesting. A lot of variety despite it being pro-restricted. You could easily spot the "celebrity" MUAs like Kevin James Bennett, Jon Hennessey and James Vincent, and then the industry workers (I overheard two ladies discussing their work on The Americans) mixing in with the small-scale freelancers and Sephora girls (like me), as well as a lot of students.

I will definitely be going back next year, and if you have a professional interest in makeup, I would highly encourage you to check out the closest show to you next time around. :)


The Makeup Show NYC 2013 Recap Pictures

This was the entrance to the show on the first day. It takes place at the Metropolitan Pavillion, which is a lovely and spacious building right near Union Square.


I really enjoyed seeing the random Canadian flag displayed proudly at the Face Atelier booth!

The Makeup Show NYC 2013 Recap Pictures Nars Kevyn Aucoin

The Makeup Show NYC 2013 Recap Pictures Face Atelier Ellis Faas

These were some of the vendors on the main floor. I have the say the Nars folks represented their brand most consistently, with their crisp white shirts and pristine makeup. I was really excited to see Ellis Faas there as well, since I had had such mixed experiences with their line and really wanted to give them another chance - and the discount made it easier. :P

Side note - get your shopping done on the first day if you are looking to stock up on certain things. By noon on the second day, a lot of the brands were sold out of the hotter items. (The first thing I snagged was the Nars Pierre Hardy Boys Don't Cry Blush. It was gone by the next morning.)


If you're looking to try things on, don't forget to bring a small mirror. Not all the brands are going to be as ready as the Bite Beauty booth guy was. (PS - Canada represent!)

The Makeup Show NYC 2013 Recap Pictures

The Makeup Show NYC 2013 Recap Pictures MAC Keri Blair

Then there were the free seminars and demos. This was Keri Blair, one of the top trainers for MAC, teaching Era Reinterpreted, doing a modern take on a 1920s look. She focused on creating a diffused smoky, lamplit eye, perfect but minimal skin, and a vampy rosebud lip. She used a mix of Cyber, Blue Lipmix and Teal Reflects to create the lip, and I wish I had a closer picture to convey its pure awesomeness.

The Makeup Show NYC 2013 Recap Pictures James Vincent

This was James Vincent, a veteran of the industry and the Director of Artistry and Education for The Powder Group and The Makeup Show. He introduced the Keynote speakers (and did the wonderful interview with Dick Page).

The Makeup Show NYC 2013 Recap Pictures Brigitte Reiss-Andersen

This was Brigitte Reiss-Andersen, another 30-year veteran of the industry, who has worked in Fashion, Editorial and as a celebrity makeup artist. Incredible body of work, and she demonstrated her tremendous speed and skill by doing three looks on one model in 15 minutes - 1) clean editorial 2) natural and 3) glamour. If you're inclined to watch, I posted the video I took here

There were also some fun body-painting demos throughout, particularly at the Kett, Mehron, Graftobian and MUFE booths.

The Makeup Show NYC 2013 Recap Pictures Make Up For Ever

The Makeup Show NYC 2013 Recap Pictures Graftobian

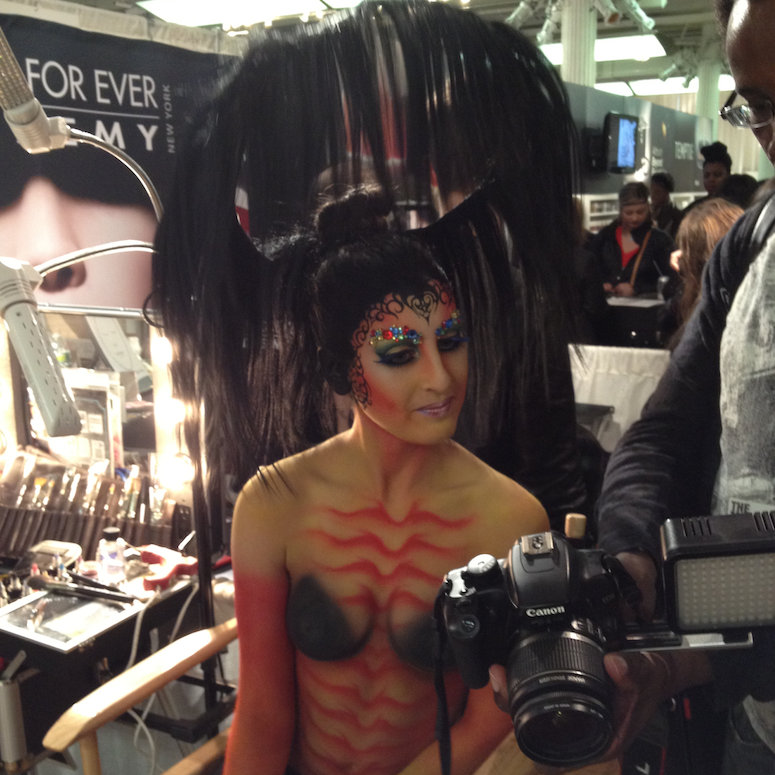
You may recognize the artist in the picture above as Athena Z, from the second season of Face Off. :)

And, of course, there was the shopping....

The Makeup Show NYC 2013 Recap Pictures Haul ellis faas, graftobian, hakuhodo, inglot, kevyn aucoin, nars, nurturing force, occ, smashbox, stila, z palette

I restrained myself to the items that I would normally have a harder time getting, especially at the pro discount price. And, of course, I HAD to get my first Hakuhodo brushes. They are, indeed, made of kittens and love.

So yes. That was my weekend, more or less. (Plus visiting with family and friends.) Imma go pass out now.

January 21, 2013

Becca Radiant Skin Foundation and Shimmering Skin Perfector

I first encountered Becca as a brand at The Makeup Show a couple of years ago. The line had immediate appeal - a natural but polished aesthetic, focus on healthy, glowing skin and some of the sweetest people manning both the booth and the company. My budget at the time didn't stretch beyond a small sampling of their wares (a lipgloss), but I walked away with the the intention of getting some more items as soon as I could.

"As soon as I could" stretched until fairly recently, unfortunately. I heard that their UK distribution was closing down, and I thought that was a shame, as this is a brand that deserves more attention. Not everything they do is perfection (it seems like their eyeshadows have been hit-and-miss from what I've read) but they do excel at face products, which is what I splurged on when I placed my order. I ordered the Radiant Skin Satin-Finish Foundation in Buff, the Shimmering Skin Perfector in Opal (and received a sample of the same in Topaz), and a couple of their renowned Beach Tints (which will be reviewed separately).

becca radiant skin satin finish foundation buff
Radiant Skin Satin Finish Foundation in Buff
I originally planned on purchasing the Luminous Skin Foundation, which is what they are famous for, but it has the coverage level of a tinted moisturizer, which I wasn't really feeling at the time. Radiant Skin purports to have "medium buildable coverage" and a "lightweight radiant finish", which all sounded aces to me.

Picking out a foundation colour online is always a delight, but Becca did make it easy with good descriptions and swatches on the Sephora site, and a foundation finder on their own site. I went with Buff, which is just a touch too yellow-toned for me (more so in the swatch below than when actually applied) but otherwise very workable.

becca radiant skin satin finish foundation buff
Radiant Skin Satin Finish Foundation in Buff
Part of what makes it workable is that this is not exactly a medium coverage foundation. I would say light at one coat, medium at two. You can build it without it looking cakey, but you need to do so carefully. I found I had the best results with a flat-type foundation brush, particularly the Contour Brush from Glamcor, which maximizes the coverage without leaving behind any streaking. When I used my favourite buffing brushes, the foundation picked up too much on skin texture and had a hard time applying smoothy.

The finish is interesting - it does indeed possess a radiant glow, yet unlike many satin-finish foundations, I found it dries very quickly and almost matte at first. It needs about thirty minutes to settle into the skin to achieve that luminosity, and continues looking more and more like skin as the day progressed. It doesn't settle into pores or move around, though for that first half hour it does pick up surface dryness. It lasts relatively well, with some breakdown around the corners of my nose at the 7-8 hour mark. (For what it's worth, my skin at the moment is combo/normal to dry, with visible pores on and around my nose.)

Overall, it actually reminded of the Bourjois Healthy Mix Serum Gel Foundation.

Now as for the Shimmering Skin Perfector - well, this is the be-all-end-all product in their range, to hear it told. It has achieved a certain cult status thanks in part to the exposure it received on the Pixiwoo YouTube channel. And after testing it, I have to agree with the accolades.

Large bottle: Shimmering Skin Perfector in Opal
Small tube: Shimmering Skin Perfector in Topaz
I debated between Pearl (which is more white-based) and Opal (which has a golden-peach hue) and opted for the latter because I tend to favour warming highlights. And it is beautiful. While it appears alarmingly opaque when first pumped out, it sheers out to the perfect shimmer, reflective and dewy, not sparkly. The peachy undertone isn't perceptible on my skin, it just allows the shimmer to blend in without looking stark.

It can be used straight to add a more focused shimmer, or it can be mixed into a foundation to add all-over glow. I would be very light-handed with the latter, because while this is a very refined shimmer, it does still pack a punch. You may end looking a little more Studio 54 than planned.

I didn't have a chance to wear Topaz, so I can't comment on it, though I imagine it would look fantastic on deeper skin tones than mine.

One caveat I have is that the pump bottle is sleek and elegant, but it pumps out more product than you probably need at one time. I also don't see the point of having an SPF in something that tends to be used in spots rather than all over.

becca shimmering skin perfector swatch opal
Shimmering Skin Perfector in Opal

becca shimmering skin perfector swatch topaz
Shimmering Skin Perfector in Topaz
And in keeping with my New Year's Resolutions, I wanted to add something to the review format. Instead of just swatches, a quick before-and-after application.

Becca Radiant Skin Foundation


I kept this makeup very simple, mostly to demonstrate the two products reviewed.

Embryolisse Lait-Creme used as a moisturizer/primer.

I applied and blended the Radiant Skin Foundation with a Glamcor Contour Brush (which is best for achieving stronger coverage without the "stroke" marks of a tradition flat foundation brush), going over some areas with a dab more. I went without concealer to show the level of coverage. I did not apply powder.

For the blush, I used a Real Techniques Contour Brush to apply Becca Beach Tint in Watermelon (and applied the same to my lips using my pinkie). I applied the Shimmering Skin Perfector in Opal to my browbone and the tops of my cheekbones with the Real Techniques Setting Brush.

For my eyes, I applied Burberry Trench all over the lid as a base using a MAC 239, and Burberry Midnight Brown very softly through my crease using an Inglot 6SS Crease Brush, and under my lower lash line using the MAC 239. For lashes, I used one coat of the Buxom Lash Mascara.

burberry trench midnight brown becca radiant skin foundation buff shimmering skin perfector opal beach tint watermelon

And for fun, the look under an Instagram filter, feeling all Monica Vitti.

Availability: The Radiant Skin Foundation is priced at 42$ USD on www.beccacosmetics.com, and 51$ CAD at www.sephora.com. The Shimmering Skin Perfector is 41$ USD and 50$ CAD at those same sites.

Pros: Radiant Skin is dewy, light-feeling, ideal for skin that doesn't need a ton of coverage but needs some extra luminosity. Shimmering Skin Perfector is concentrated glow in a bottle, sheerable to the most natural, healthy-skin effect.

Cons: The foundation does take a bit of time to settle, during which time it can pick up on dry texture. It is more light than medium in initial coverage, has to be built up with care. The only downside to the Perfector is the over-generous pump.

What do you guys think? Have you tried any Becca products? Are you, like me, hoping they continue to be a presence on the beauty scene?

(I purchased these items from the Becca website.)

August 15, 2012

Inglot Eyeshadows - Cool Neutrals and Greys

Another post in my Inglot eyeshadow swatch series. These eyeshadows can be purchased from Beautylish.

As a refresher, this is my personal breakdown of the finishes:

AMC - textures range, but overall are supposed to be some of the most pigmented shades they offer.

Shine - finely milled, buildable, with lovely sheen.

Pearl - have anywhere from a light pearl, to a frosty, even metallic finish.

Matte - completely matte, and incredibly pigmented and buttery for this type of finish. Easily one of the best matte textures on the market.

Double Sparkle - tend to have a matte or satin base, with some very fine sparkle layered in.

The following palette was my attempt at a "cool" neutral set. Mostly focused on greys and plumy taupes.

Inglot Eyeshadows - Cool Neutrals and Greys

Inglot Eyeshadows - Cool Neutrals and Greys


All of the following swatches are on bare skin, as usual.

Inglot Eyeshadows - Cool Neutrals and Greys
Indirect natural light.

Inglot Eyeshadows - Cool Neutrals and Greys
Combo of indirect natural light and artificial light.

Inglot Eyeshadows - Cool Neutrals and Greys
Direct sunlight.

The top row: pearl 434, pearl 420, pearl 444, pearl 448, shine 35.

Yeah. ALL of these are super-duper pigmented, dense and buttery, with the shine 35 being the sheerest as can be see in the full sunlight swatch. Pearl 434 and pearl 420 are my picks - both are incredibly beautiful plum-tone greys.

Inglot Eyeshadows - Cool Neutrals and Greys
Indirect natural light.

Inglot Eyeshadows - Cool Neutrals and Greys
Combo of natural and artificial light.
Inglot Eyeshadows - Cool Neutrals and Greys
Direct sunlight.

Bottom row: matte 378, double sparkle 460, pearl 423, matte 344, pearl 397.

Both of the mattes here are fantastic. So dense you have to be careful how much you pick up. With a soft brush and a delicate hand, the matte 378 is amazing for the crease and outer V. The matte 344 is my choice for blending out a darker shade from the crease. The double sparkle 460 has a smoother, less dry texture than most of the other DS shades I own, and the micro-glitter is less apt to fall down during application. I was a little surprised by how pale the pearl 397 actually was when applied to the skin compared to its peachy appearance in the pan, but it makes for an excellent color to use on the inner corner of the eye.

For cool-toned skin, I think these shades are stellar, and they can't be faulted for performance.

I have one more palette to swatch, but in the meantime - what do you guys think of the Inglot shadows so far?

(I purchased these from Inglot.)

August 13, 2012

Inglot Eyeshadows - Purple and Burgundy

I meant to get back to these swatches sooner, but...well, shiny new things distracted me. These eyeshadows can be purchased from Beautylish.

My general thoughts on the eyeshadow formula are included in the first post in the series here. The rest of the posts are viewable here.

All swatches are on bare skin, no primer.

Inglot Eyeshadows - Purple and Burgundy

Inglot Eyeshadows - Purple and Burgundy


Man, I love purples. I only wish I had green eyes to really make these colours pop.

Inglot Eyeshadows - Purple and Burgundy
Indirect natural light.

Inglot Eyeshadows - Purple and Burgundy
Indirect natural light, different angle.

Inglot Eyeshadows - Purple and Burgundy
Direct sunlight.

The top row: matte 325, pearl 446, pearl 452, pearl 445, pearl 440

The application and pigmentation on all of these is excellent. Classic Inglot - buttery, dense, excellent payoff. The matte shade is almost ridiculously pigmented, and by far one of the best purples I have ever encountered.

Inglot Eyeshadows - Purple and Burgundy

Inglot Eyeshadows - Purple and Burgundy

Inglot Eyeshadows - Purple and Burgundy


Bottom row: double sparkle 494, pearl 441, pearl 439, amc 67, matte 379

The DS and AMC shades both gave me the most trouble, in that they had a somewhat drier texture that grabbed onto the skin, making blending less smooth. That said, they are both still intensely pigmented, they just need more care in application. The microglitter does tend to fall out during application as well.

Pearl 441 has a beautiful, subtle duochrome effect - a gorgeous light violet that flashes a teeny bit blue.

Purples tend to be one of the most difficult colours to get right, so kudos to Inglot for making enough that I can easily put together a full palette of great performers.

July 10, 2012

My first Youtube video! Montreal Sephora Haul

Ok, so I've decided to dip my toes into the wild world of Youtube. It's pretty much terrifying. I am also the least tech-savvy person on the planet, so I have A LOT to learn.

That said, here is my first attempt. It was filmed with my iPhone, and is viewable in HD formats. The sound is a bit low, so you will likely need to adjust the volume (working on that).

Please let me know what you think - I greatly appreciate comments and feedback, especially if you also post on Youtube. (I have a review video uploading now, so hopefully I should be able to get that up later today as well.)

February 07, 2012

Inglot Eyeshadows - Blues and Blacks

Part three of my Inglot swatching series - part 1 (yellow to greens) is here, and part 2 (neutral browns) is here. This part focuses on my palette contained aquas, blues and blacks. All swatches are on bare skin, no primer.

These eyeshadows can be purchased from Beautylish.
Inglot Eyeshadows - Blues and Blacks
Indirect natural light.

Inglot Eyeshadows - Blues and Blacks
Artificial light.

Inglot Eyeshadows - Blues and Blacks


Top row: shine 17, shine 32, pearl 413, matte 338, pearl 426.

Inglot Eyeshadows - Blues and Blacks
Indirect natural light.

Inglot Eyeshadows - Blues and Blacks
Artificial light.

Inglot Eyeshadows - Blues and Blacks
Direct sunlight.
The first three shades of the top row are the sheerest, but are lovely all the same. The matte teal is absolutely stunning, and probably my favorite out of all of them, though the cerulean blue pearl at the far right is a close contender.

Bottom row: pearl 429, matte 332, ds 483, amc 61, amc 63.

Inglot Eyeshadows - Blues and Blacks
Indirect natural light.
Inglot Eyeshadows - Blues and Blacks
Artificial light.

Inglot Eyeshadows - Blues and Blacks
Direct sunlight.
The darker bottom three shades have a particular texture - drier than the buttery smoothness I experience from the matte shades, and scattershot with sparkle. The application is not as smooth as the mattes tend to be, but I do like to use these to deepen and smoke out a crease.

The matte navy shade also has a drier than all the other mattes I've tried. It's a trifle more work to use, in that it both stains and sheers out really easily. It is, however, much easier to deal with than Nars Outremer, which is a similar shade with godawful pigmentation.

January 17, 2012

Inglot Eyeshadows - Neutrals

This is part 2 of the Inglot swatching project, begun here. This palette contains the more neutral-toned browns and lighter shades. As always, these are done on clean, bare skin, no primer.

These eyeshadows can be purchased from Beautylish.

Inglot Eyeshadows - Neutrals
In indirect light.

Inglot Eyeshadows - Neutrals
With flash.

Inglot Eyeshadows - Neutrals


Inglot Eyeshadows - Neutrals
In indirect light.
pearl 395, shine 8, pearl 422, pearl 402, matte 360

Inglot Eyeshadows - Neutrals
In direct sunlight.
A couple of lovely highlight shades, and some medium tones for adding depth. I really love the taupe-ish shade as an all-over, easy wash.

Inglot Eyeshadows - Neutrals
In indirect light.
matte 327, amc 52, shine 31, matte 337, matte 350

Inglot Eyeshadows - Neutrals
In indirect light, different angle.

Inglot Eyeshadows - Neutrals
In direct sunlight.

The matte shades apply very, very opaquely. You actually have to be conservative with how much you pick up on your brush, or you are liable to get too much on. I know a couple of Inglot MUAs have said that it took some getting used to after having worked with other brands, as they tended to crush their brush right in there. They had to train themselves to use a lighter hand.

I have two more palettes of what I would consider "neutral" shades; one with richer, bronze tones, and the other with taupes and grays. Between those three, I feel like the neutral range is pretty well covered. (Not that this stops me from trying or buying every conceivable shade of taupe and bronze out there!)

What do you think?